A ceiling fan remote can get a lot of problems while in use, however if your Hunter fan remote has stopped working, you need to fix it by going through these solutions.
If your Hunter fan is not responding to the remote, start by replacing the batteries in the remote with fresh ones and ensure that the receiver and transmitter are paired to the same frequency. If the problem persists, try to set a different control frequency on both the remote and the fan and also check the signal strength of remotes infra Red.
Let’s have a look at a comprehensive and straightforward step-by-step procedure to identify and resolve the issue with your Hunter fan remote.
Please Note: Before proceeding with any electrical work on your Hunter ceiling fan, ensure all power is switched off to the fan by checking your house circuit breaker.
Why Is My Hunter Fan Not Responding To The Remote?
- The first step is to ensure the power is turned on to the Hunter ceiling fan. Verify that the home circuit breaker is on. If there was a power surge, it might have disabled the unit by switching it off. If you need to perform any electrical work on the ceiling fan, remember to switch off the circuit breaker first for safety.
- Try to turn on the fan by using an alternative control such as the remote. If it still doesn’t work, try using the pull chains or wall control (if your fan has them) to turn on the ceiling fan. If the fan doesn’t respond to any control method, the problem might lie with the fan itself, not the remote.
- If you are able to operate your Hunter fan using the pull chains or wall control, then ensure that the batteries in the remote are not dead and that the battery compartment and ‘contact points’ are free from corrosion.
If there is corrosion, remove the batteries, and clean the contact points using a Q-Tip dipped in a little vinegar or gently use a small piece of sandpaper to clean them. Insert new batteries and test the remote again.
You should try using the remote closer to the ceiling fan to determine if the signal is weak. If the remote works better when closer to the fan, there might be signal interference or obstruction. We will cover solutions for weak signals in this article below.
After trying all these steps, if your Hunter fan still doesn’t respond to the remote, we’ll proceed to the next steps to find out the reason.
Check The Hunter Remote Control Infra Red Signal
- If your fan uses infra-red technology, the first step is to make sure that the infra-red lenses are clean. You should be able to locate a sending lens on the remote and a receiving lens on the ceiling fan and it is necessary to clean them both by wiping them to make the proper communication link.
- If the fan still does not respond to the remote then you might be dealing with a malfunctioning Infra Red light. To check this, you can use your smartphone’s camera, as Digital cameras can detect infra-red signals.
- Open the camera app on your smartphone and point it towards the remote control for your Hunter ceiling fan.
While pressing the remote’s buttons, observe your phone’s screen. - You are noticing the light from the remote on your phone’s screen. If you see the infra-red light appearing on the screen, it indicates that the remote’s infra-red signal is working correctly.
- If you see that the light on your phone’s screen stays on even when you are not pressing any buttons on the remote, it suggests that one of the remote’s keys is stuck.
This can cause the remote to repeatedly send the same commands and you will have to fix it to resolve the issue.
Please watch this video below to go through the steps.
If your ceiling fan and remote are still not talking to each other, you will have to proceed with the next steps to make sure they are properly paired and on the same frequency.
How Do I Reset My Hunter Remote
To reset your Hunter fan remote, you have three methods using either a pairing button or dip switches. We are going to see all three below with videos.
- Pairing Button Method:
- If your remote has a pairing button on the reverse side (exposed by removing the battery cover), follow these steps:
- Turn off power to the fan at the circuit breaker switch.
- Turn the power back on.
- Within 3 minutes of restoring power, press (but do not hold) the pair button on the remote.
A beep should indicate successful pairing.
Please have a look at our article on How To Pair A Hunter Fan Remote
2: Dip Switch Method: If your remote has dip switches, ensure that the dip switch settings on the remote should be same as those on your Hunter ceiling fan. For detailed instructions, check our article on: How To Pair a Hunter Fan Remote.
3: Remote Without Dip Switches or Pairing Button: If your remote lacks dip switches and a pairing button, follow the instructions in the video provided in this article and also read our post on: Pairing a Hunter Fan Remote.
This article shows a step-by-step guide to pairing your remote without dip switches or a pairing button.
If you’ve tried all the above tips and your remote still doesn’t work, there might be issues with the electronics inside the remote or the ceiling fan model.
You should try replacing the fan remote with the same model, preferably from the manufacturer of the same ceiling fan manufacturer or brand or a recognized Universal remote compatible with your Hunter ceiling fan.
If you are looking for a Universal Remote that can be compatible with your Hunter ceiling fan, you need to look at Universal Remotes by using this link: Hunter Universal Remotes.
If the problem persists, it’s recommended to get help from a qualified electrician, as there may be a more complex issue that requires professional expertise.
You might also need to replace the remote and/or the receiver, and for that, you can refer to our article on Hunter Ceiling Fan Replacement Parts for information on how to contact Hunter’s support team. When reaching out to the support team, the first thing is to know your model number. To find your model number, refer to the video provided in the article below.
You might also be interested to see some more topics below which are relevant to your Hunter Fan Remote.
How Do I Reset My Hunter Remote?
To reset your Hunter Remote, you need to locate the pairing button. Most newer Hunter Fan remotes have a pairing button on the reverse side, accessible by opening the battery compartment.
If your Hunter fan remote is already paired, turn off the power to the fan at the circuit breaker for at least 10 seconds. Then, turn the power back on.
Within 3 minutes of turning the power on, position your remote near the Hunter fan receiver you wish to pair with. Press (but do not hold) the Pair button on the reverse side of the remote. The pair button is available on remote’s reverse side. To expose it, you need to open the battery compartment.
This will unpair your Hunter ceiling fan.
To re-pair your Hunter ceiling fan, repeat the same steps again.
You might also want to have a look at our article: How To Program A Hunter Ceiling Fan
Why is My Hunter Remote’s Blue Light Stays On?
If your Hunter remote’s blue light stays on, there could be several reasons for this issue. Typically, the light should only remain on for the moment after pressing one of the remote keys.
If your Hunter remote blue light stays on then the batteries on your remote are dead or your remote is broken and need replacement. Another cause can be one of the remote buttons are stuck and remain in the pressed position. In this case, you have to unstick them which are pressed.
Here is a list of causes what might be the reasons your Hunter fan remote blue light to stay on.
- Weak or Dead batteries in the remote – Replace Them
- Battery contacts in the Remote need cleaning – Clean Contacts
- Glitched Remote settings – Power Cycle the Hunter Fan
- A faulty remote control unit – Change Hunter Remote
- Incorrect Dip switch settings set on the receiver – Reset Dip Switches
- Defective receiver – Install a New Receiver
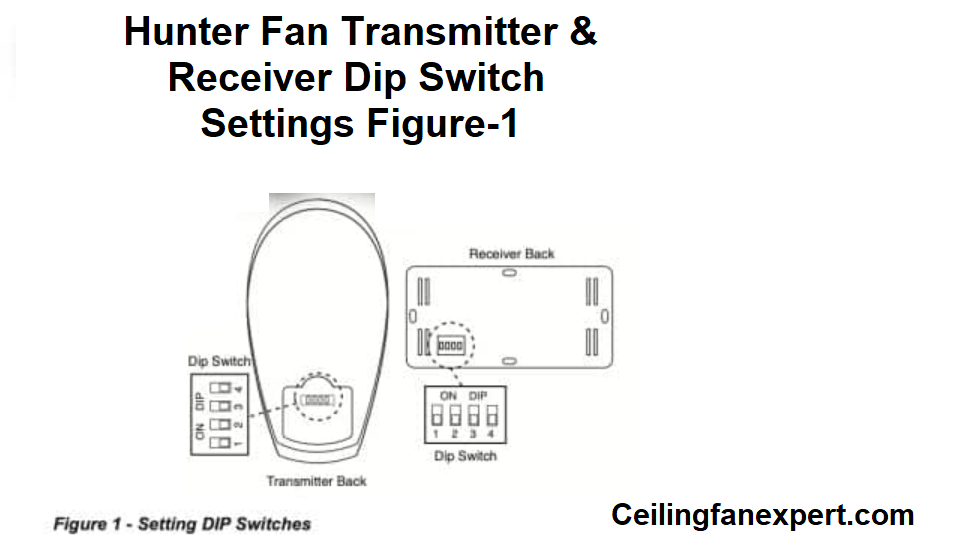
Where Is The Dip Switch On A Hunter Fan?
The DIP switches on a Hunter fan can be found in two locations:
- Remote Control: The DIP switches are located under the battery compartment of the remote control. To access them, remove the battery cover.
- Receiver: The flat side of the fan’s receiver also houses the DIP switches.
Check the Dip Switch Locations Image above.
How Do I Sync My New Hunter Fan Remote?
To sync your new Hunter Fan Remote, you have to read our article: How To Pair Hunter Fan Remote.
Final Words
These troubleshooting tips and tricks for your Hunter Fan remote should be helpful in most cases. Remember that simple solutions like replacing the batteries might fix the issue, but for more complex problems, the solutions discussed above should cover most reasons why your Hunter fan remote is not working.