Hunter Ceiling fans are highly durable and efficient. These fans are equipped with remote control units that need to be paired with the receiver. Fortunately, all new Hunter ceiling fans come pre-paired, right out of the box. Nevertheless, if you have never paired your remote before or are experiencing difficulties with the pairing process, this article provides various solutions to guide you through the step-by-step pairing and programming of your Hunter Fan Remote.
To pair a Hunter Fan remote, begin by turning off the power to the fan using either the circuit breaker or wall switch. Keep the power off for at least 10 seconds before turning it back on. Within three minutes of restoring power to the fan, press and release the pair button on the remote. You will hear a beep to confirm that the pairing was successful.
In addition to the basic pairing process mentioned earlier, we will now go into more detailed instructions for various situations that need a different approach. These include situations:
- Losing a remote and needing to pair a new one.
- Pairing and programming a remote that does not have a pair button.
- Pairing a remote that does not have dip switches or a pair button.
When you purchase a brand new Hunter ceiling fan, you will not have to pair the remote, as it is already paired with the receiver. However, if you happen to lose your remote or encounter interference issues with multiple ceiling fans and remotes, you will need to reset and pair each one individually.
Now, let’s focus on where the remote comes with a pairing button.
Pairing and Programming Hunter Fan Remote
Here is a step by step guide to pair your Hunter remote with your receiver:
- Start by removing the battery door on the back of the remote to access the pair button.
- Proceed with power cycling the fan using the following instructions: a. Turn off the power to the fan using either the circuit breaker or wall switch. b. Ensure that the power remains off for at least 10 seconds. c. Turn the power back on by using the circuit breaker or wall switch.
- Within three minutes of turning on the power to the fan, press and release the pair button on the remote. Make sure not to hold down the button. You should hear a beep sound, and some remotes may also have a flashing blue light to indicate successful pairing.
Note: Hunter’s remote control pairing function serves both the purpose of unpairing and pairing the controls. This means that if the remote transmitter and the receiver were previously paired, using this function will unpair them, and vice versa.
How To Pair Your Hunter Fan Remote If It Does Not Have A Pairing Button
Important Note: Before changing the DIP switch settings on your receiver, it is necessary to disconnect the power mains to the ceiling fan and light kit. Turn off the wall switch and move the circuit breaker to the OFF position. We do not hold any liability for the outcome of following these instructions. If you feel unsure or lack confidence, it is recommended to consult a qualified electrician.
Change the default DIP switch settings to make it compatible with your own unique code.
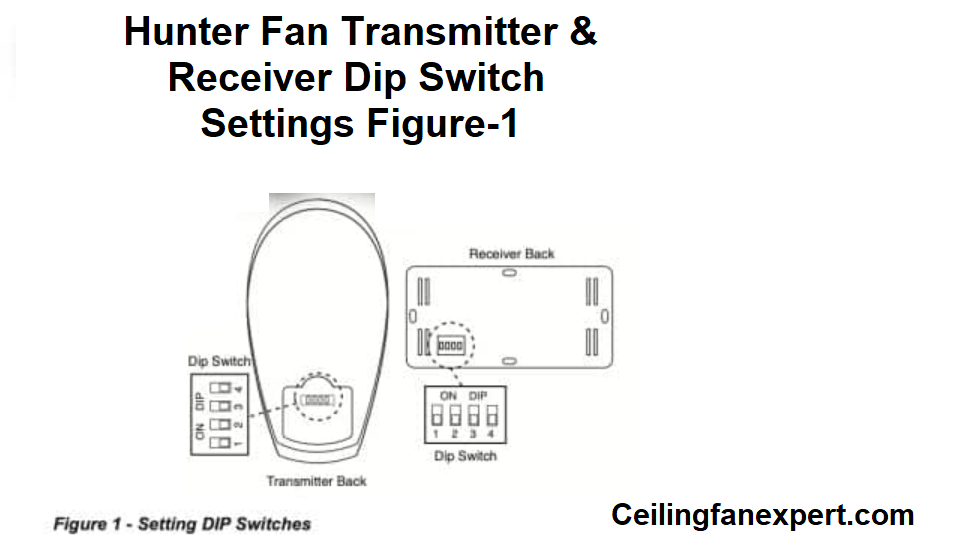
To customize/change the DIP switch settings, follow these steps
- Locate the DIP switches under the battery compartment on the Hunter Fan remote and on the flat side of the receiver. See Figure 1 below for reference.
- Before making any DIP switch changes, remove the battery from the remote and turn off the power to the fan.
- Ensure that the DIP switch settings on both the remote transmitter and receiver match. If they do not match, the Hunter ceiling fan will not work.
- Make sure the DIP switch combination on your ceiling fan’s receiver and transmitter is different from the combinations used on any other ceiling fans, as well as other receivers and transmitters in your home (such as garage door openers or entertainment equipment).
- After setting the DIP switch settings on the remote to match the ON/OFF combination of DIP switch settings on the receiver, install a 12-volt alkaline battery inside the Hunter Fan handheld transmitter. Refer to Figure 1 above for visual guidance.
If your Hunter Fan remote does not have a pair button and lacks DIP switches, follow the steps outlined below. You should read our related article on Hunter Fan Remote Not Working – Troubleshooting Guide or watch the video given below.
How To Pair Your Hunter Fan Remote If It Does Not Have A Pairing Button and No Dip Switches
If you find that your Hunter Fan is paired with two remotes on the same frequency and interfering with another nearby fan, and you don’t have a pairing button or DIP switches, follow these steps to resolve the issue. Refer to the picture below for the remote you will be using in the procedure.
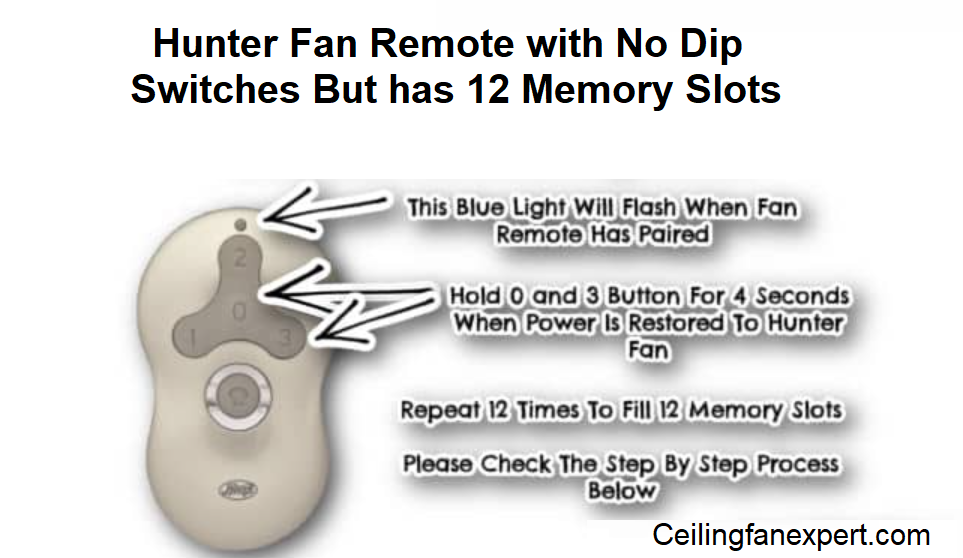
If your Hunter fan remote operates on a single frequency without DIP switches, it means it has 12 memory slots. To prevent interference with nearby fans, you need to fill all 12 memory slots in the remote.
These particular Hunter fans have 12 memory slots that can be paired with up to 12 remotes. To pair your remote, follow these steps:
- Turn off the fan at the circuit breaker switch.
- Restore power to the fan by turning the circuit breaker switch back on.
- Within 3 minutes of restoring power, simultaneously hold down the 0 and 3 buttons on the remote for 4 seconds.
- The remote control’s blue light should flash, and the fan should start to slowly spin, indicating successful pairing.
- Repeat steps 1 through 4 a total of 12 times, ensuring all memory slots are filled.
If you have a 2nd Hunter Fan with the same remote, you will need to use its remote and follow the same process above to fill its 12 memory slots. This ensures that both ceiling fans and their respective remotes are dedicated to only one fan and will not interfere with each other.
Here is a useful pdf to download guide on How to Properly Install Multiple Remote-Controlled Fans
How To Program a ‘2’ Series Hunter Fan Model
To program a ‘2’ series Hunter Fan with the remote, follow these step-by-step instructions. Most Hunter brand fans manufactured since 2016 are ‘5’ Series Fans, while older models are typically the ‘2’ Series Fans. If you want help to find your model number, please check our guide on: How To Find Hunter Fan Model Number – Hunter Fan Replacement Parts
- Always keep in mind to turn off the fan power at the wall switch or circuit breaker before starting.
- Slide open the battery compartment on the back of the remote and remove the batteries.
- If your receiver has DIP switches, change the DIP switches on both the remote receiver and transmitter to ensure they are same.
- Turn the power back on to the fan and re-insert the batteries into the remote control.
- Simultaneously press and release the HIGH (3), MEDIUM (2), and LOW (1) buttons on the remote control. Make sure to complete this step within 30 seconds of restoring power to the fan.
- Verify successful programming by using the remote control to turn the lights on and off on the fan.
How To Pair a ‘5’ Series Model Hunter Fan
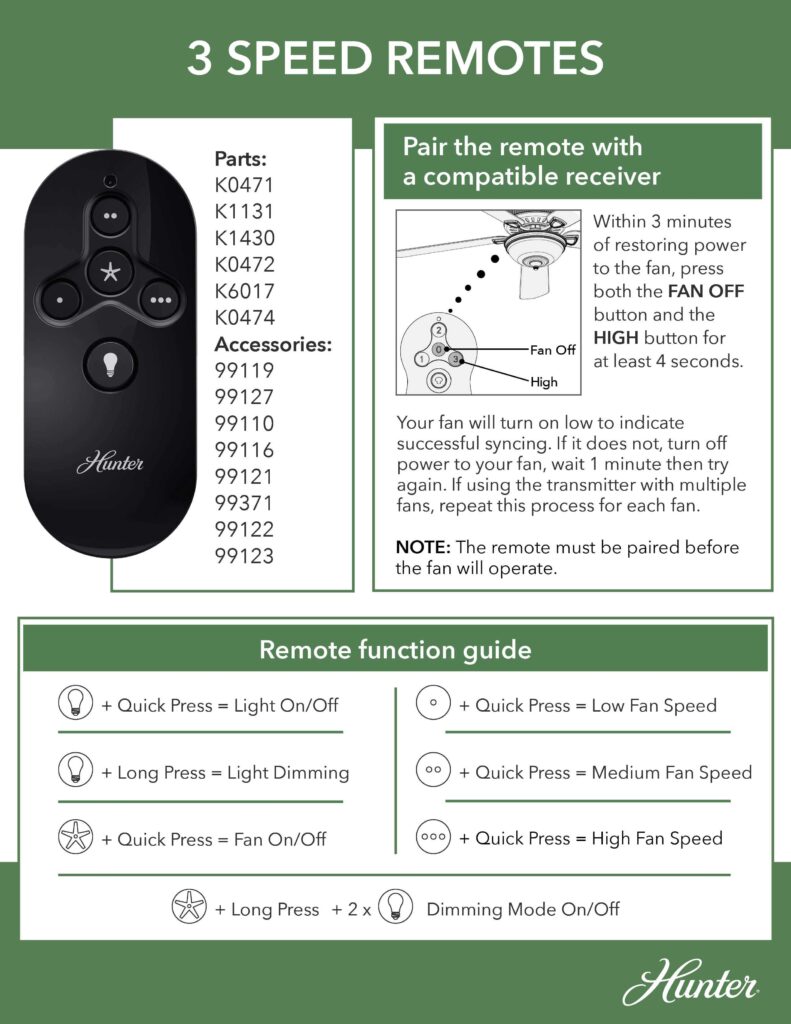
Remote Model Numbers: 99371/k6017, k532401000, k5323, 99116/k140302000, 99110/K113101000, 99122/99123/k0474010000, and 99199/99127/k047101000
- Firstly, turn off the power to your fan for at least 10 seconds with the help of the wall switch. This ensures that the receiver has sufficient time to power down. Then, turn the power back on.
- On the remote control transmitter, press and hold both the ‘FAN’ button and the ‘SPEED 3’ button for four or more seconds. The process should be completed within three minutes of restoring power to the fan.
- If your Hunter Fan Remote was previously unpaired, it will pair the remote and receiver now. The fan will be set to low speed, and the remote light will blink three times and remain on.
- If your remote and receiver were previously programmed, they will now be unprogrammed. If the fan was running, it will turn off. Then, the remote light will blink twice and turn off.
Please check out the video below.
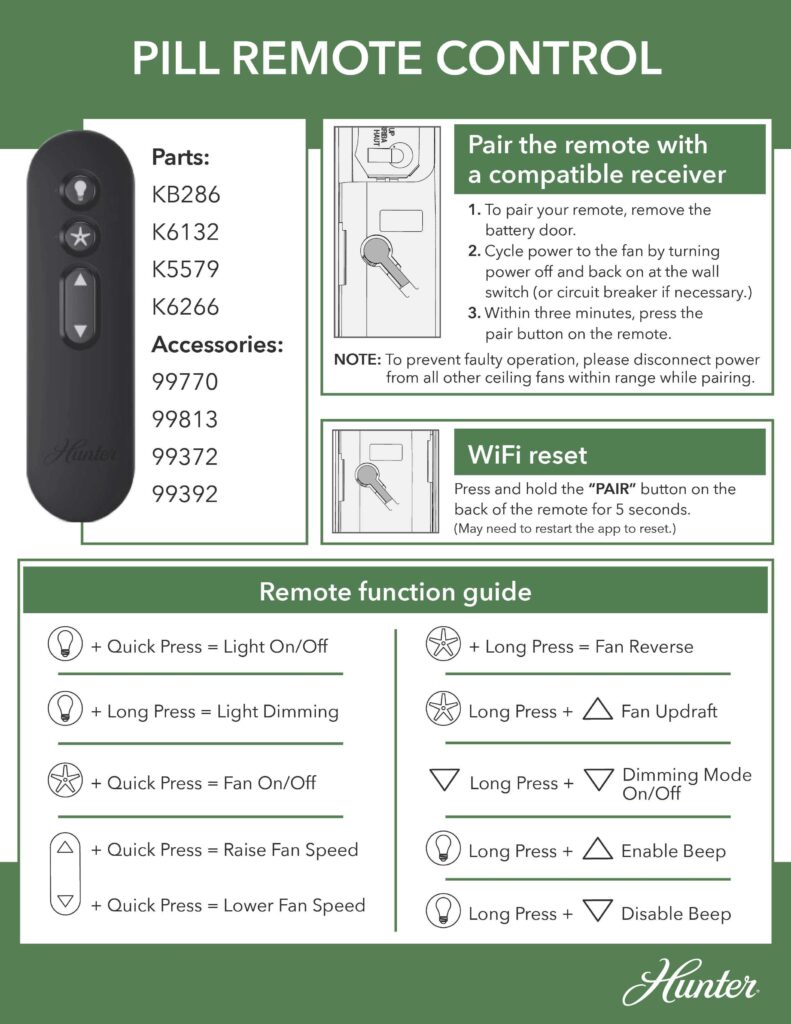
Remote Model Numbers: k626601000/k626602000, 99372/k6019, k5579010000, and 99198/k6266-03
- Turn off the power to your fan using the wall switch for 5 to 10 seconds, and then turn it back on.
- Within three minutes of restoring power to the fan, quickly press and release the ‘PAIR’ button on the back of the remote transmitter.
- If the ceiling fan and remote were previously not synced, they will now be synced. The Fan Remote Light will blink 3 times and remain on. The fan will be set to low speed.
- If the fan and remote were previously programmed, they will now be unprogrammed. If the fan is running, it will turn off. The light on the fan remote will blink twice and switch off.
NOTE: If the pairing of the Fan Remote and Receiver is not successful, turn off the power to your ceiling fan at the wall switch, wait for at least one minute, and then try again.
You can download a guide on using multiple fans and remotes here: How to Properly Install Multiple Remote-Controlled Fans Guide
Universal Hunter Ceiling Fan Remotes
If you have misplaced your Hunter Fan Remote, using a Universal Hunter Fan Remote is a convenient solution to operate your ceiling fan. Follow the steps in this article to program your universal remote with your Hunter Ceiling Fan. If you’re searching for a Hunter Universal Remote that is compatible with most Hunter Ceiling Fans, check out this recommendation of Universal Hunter Ceiling Fan Remote.
What Is The Distance Range For A Hunter Fan Remote?
The distance range for a Hunter Fan Remote typically ranges from 6 meters to 12 meters (20 feet to 40 feet). Some models can reach a distance of up to 30 meters or 100 feet. Obstacles like walls and doors can reduce the remote’s effective range. If you encounter difficulty controlling your ceiling fan, try moving closer to it.
Final Words
Pairing your Hunter Fan Remote with the Ceiling Fan Receiver is a straightforward process and proves useful when purchasing a new remote for your Hunter Fan. Whether you need to pair one remote to multiple fans or one fan to multiple remotes, the steps mentioned above will be helpful in any situation.
In order to get solutions for your remote control, you need to have a look at our article on Hunter Fan Remote Not Working where we have solved a lot of problems you might be getting with your Hunter fan remote.